Are you ready to weave? We are! But before we set off on our weaving adventure, let’s discuss tapestry a bit and provide some definitions and tricks.
Definition of Tapestry: Tapestry is a type of fiber weaving. It is weft-faced (ie: the warp does not show at all), the wefts are generally discontinuous (they do not go from selvedge (edge) to selvedge (edge)) and it is generally pictorial (like painting a picture with fiber). The actual form of weaving is plain weave which means the pattern you weave is under one thread and over the next. Because this is such a thin piece we have dispensed with the notion of not weaving from selvedge to selvedge. Other forms of weaving include warp-faced weaving where only the warp threads show and even weave, where equal amounts of weft and warp show. You can see that if you are entirely covering the warp threads, those threads will have no visible effect on the weaving since they will not show. The warp threads become your canvas but unlike an actual canvas for painting, it will not show at all.
Warp and Weft: These are the foundation of your weaving. The warp is the thread you put on the loom. The weft is the thread you weave into the warp.
Selvedge: The dictionary calls it: “an edge produced on woven fabric during manufacture that prevents it from unraveling.” Basically, it refers to the sides of your piece. It can also refer to the top and bottom of your piece once you’ve removed it from the loom and finished the edges. This is why Navajo style weaving is called four selvedge weaving, since all four sides of the weaving are finished while still on the loom.
Starting and Ending Threads: We will show you three ways to start and end weft threads. The trick here is that the ends of your weft thread need to always be in the back of the piece. If you are starting your weft thread at the selvedge you can start by weaving under the first warp which will necessarily put your weft tail at the back of the piece. If that is not possible because the next row has to go over the side warp, you can employ a pigtail (lots of information about that provided below). The other way to start (and end a thread) is to stick the weft tail behind the weaving somewhere in the middle and then start a new thread at the same place. We will address that in more detail.
Line & Shed
When weaving tapestry it is important to know that two passes of a weft thread make a line (meaning all the warp threads are covered.) Understanding this will help you understand different tapestry techniques.
Shed is the space between your lowered and raised set of warps. It is very important concept to understand when weaving tapestry. For most tapestries, you have two different sheds (when one half of your warp threads are on top of the weft and when the other half are on top). When you are weaving simple lines straight across, you know if you are in the right shed by looking at which shed you were in on the pass before. If you are in the incorrect shed, your pass through will unweave the row above rather than add a row.
How to Not Pull-In
Pulling-in is when your tapestry starts at one width and gets thinner and thinner as you weave. It is one of the most common problems that beginning tapestry students encounter.
Some tips to prevent pulling in for this project:
-Keep high tension on your loom
-Measure the width of your piece every few rows and adjust if it seems you are pulling in
For more information on how to not pull-in at the selvedges, please see the blog post “Prevent Pulling In”.
WEAVING A HEADER
The first thing we are going to do is weave a header. A header, like her brother the footer, consists of rows of warp material. Usually, this little section of weaving is folded under so at the front of the tapestry you see just the actual weft and the header and warp threads are hidden. The footer, a header at the end of the piece, has the same purpose.
Since most of you will not be using the shedding device we are using a little trick to keep one shed open. Take the spring bar (the one that normally gets placed inside the spring on the top of the loom in order to prevent the warp threads from jumping out when advancing the weaving . . . since there are so few warp threads, this isn’t really necessary) and weave it in (under one warp thread and over the next) at the top of the loom. It will stay in place right below the top beam. This open shed will allow you to just weave through it whereas you will have to use a needle to “pick” the other shed.

To weave the header, starting on either side of the loom, weave under the selvedge warp thread, over the next warp, under the warp after that, etc. until you get to the other side. Then reverse direction. As we mentioned before, this will place the tail of your weft thread behind the weaving. Weave five or six rows. End with the weft thread going under the selvedge warp thread.

When you’ve finished weaving your header, trim the end of the weft thread.

To make it easier to see what you are doing while weaving, we suggest putting a piece of paper between the back and front layer of warp thread.

WEAVING A LINE/STARTING AND ENDING THREADS
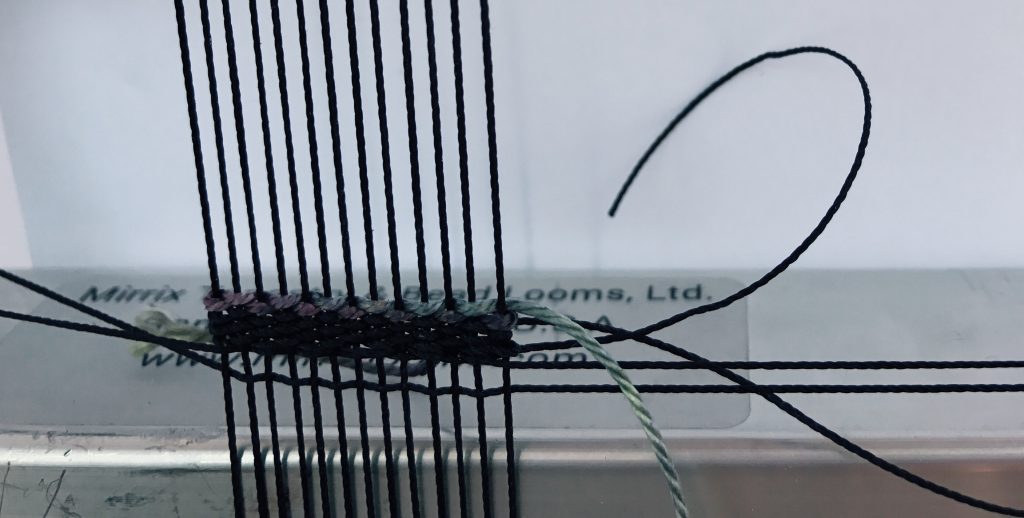
Before we begin weaving the weft yarn, I would like to address pigtails. You’ve experienced starting a thread when the side warp is raised. Easy. But what do you do when the side warp thread is lowered? We’ve made the above video to show how we begin our first row of silk using a pigtail. Let met describe what you are seeing in the video: When you weave the weft thread the tail will be above the lowered side warp thread. To do this, bring your weft thread behind the two side warp threads and then loop it around the edge thread so it is facing towards the back. Easy!
Here’s a good picture of a pigtail:

In the video below we show you how we use a tapestry needle to weave under and over the warp threads. We also use the needle to push down the weft threads. Normally one would use a tapestry beater but this piece is so thin that the point of a tapestry needle will work just fine. I also use my fingers to push down on the weft. I want the tapestry to be as dense as possible and want to make sure that no warp threads show.
Since the header ended with the tail going under the selvedge warp thread, we have to use a pigtail to start our silk weft thread. Below there are two rows of silk weft thread woven. Let’s keep going for a bit. If you are using the Mirrix variegated thread you will find you can weave one “color” and it seems like you are weaving a bunch of colors because they change within the thread. Make sure you do not pull so tightly that you distort the side warp threads. In other words, don’t pull-in. We want this piece to be a rectangle, not a triangle. You also don’t want the thread to be baggy at the edges. This will take some practice and it’s key to making a technically successful tapestry.

We are going to start a new weft thread after having woven a third of an inch. You can try to follow exactly what I am doing, but don’t get too concerned about following me exactly. For the second half of the weaving you are going to be creating your own patterns.
We are going to employ a different method for adding a new weft thread. This time we are going to end the existing thread by weaving it to the back of the piece in the middle of the piece. As you continue with your tapestry journey you will learn when it is best to replace a thread inside the tapestry or start one at the selvedge. For example, when adding a new thread for pick and pick you have to start at the selvedge with a new thread. But in this case I just want to replace the previous thread so starting in the middle makes sense.

Notice that the end of the existing weft thread is now at the back of the piece.

To start a new thread, start it where the old thread ended. The tail of the new thread will be at the back of the piece. From the front it will look like one line of weaving.

Now you can seamlessly weave with the new weft thread.


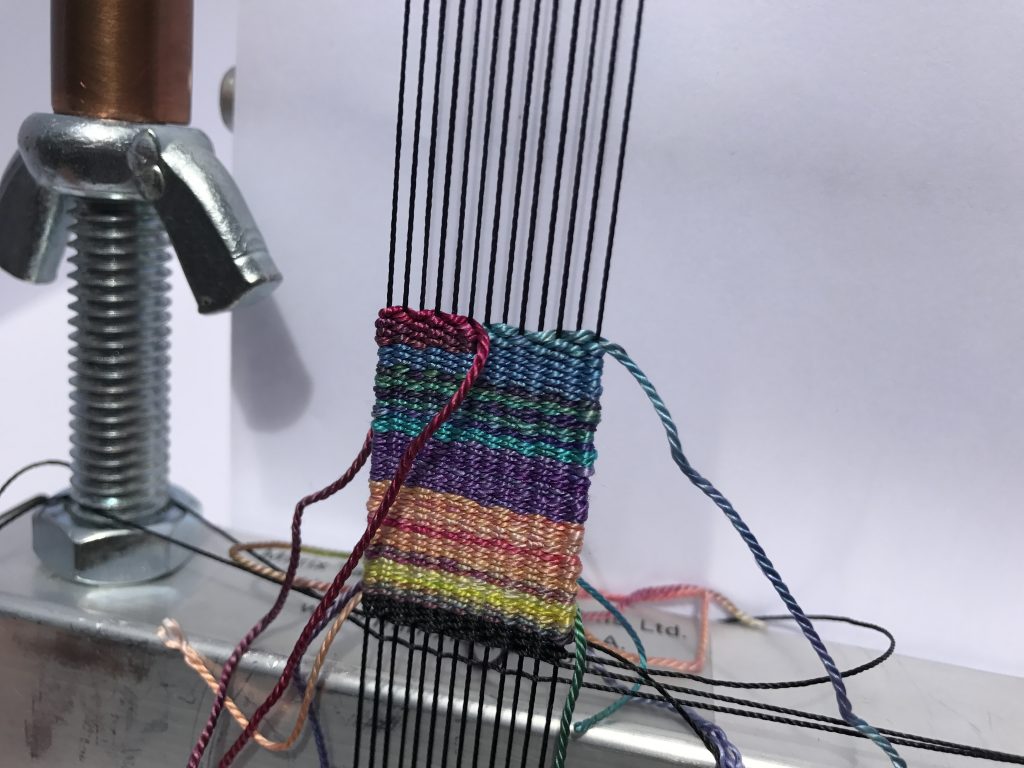
To end this weft thread, push the end to the back of the piece where you will start a new weft thread. The stripes you see here are happening because of the variegated yarn.

Start your new weft thread where you ended the previous one. Because of the sharp contrast in color, you can really see how that looks.

Weave a bit more of the new weft to practice making your selvedges straight. At this point, you want to measure the width of your piece to make sure you are not pulling in.

Before we launch into some more complex tapestry techniques, I will provide the names of those techniques and what they are:
Weaving in Opposite Directions: This is my favorite tapestry trick. It’s not even necessarily a technique so much as an approach. You set up your weft threads so that they are going in opposite directions to one another in any given shed. Now, what does that mean? The simple way to look at this is to imagine starting to two threads, one from the left and one from the right. These weft threads are now going in opposite directions. Why is this a good thing? They are alway going to be in the correct relationship to one another and will be able to travel freely into one another’s territory. As with most things tapestry, you really need to start playing with the technique to understand it.
Slit Tapestry: The weft threads meet to form a slit in between. This is great for making very straight lines and also for creating shapes.
Pick and Pick: By weaving two alternating weft threads this technique creates vertical stripes. It’s great for shading and other eye-popping effects.
Wavy Lines: By weaving two alternating threads twice each you will create what looks like wavy lines, hence the name.
Soumak Knotting: This is actually not a weaving technique since you are lopping around the the warp threads, not weaving in between them. It really is knotting, not weaving, and is often used to make items such as rugs and saddle bags because it is twice as sturdy as regular tapestry.
WEAVING IN OPPOSITE DIRECTIONS AND SLIT TAPESTRY
We are now going to work on two techniques at the same time. The one technique is weaving in opposite directions. The other is slit tapestry. We are going to do slit tapestry while weaving our wefts in opposite directions. As we mentioned, the reason for weaving in opposite directions is it makes it so the weft threads are always in correct relationship to one another.
To begin slit tapestry leave the current weft in place with its working end coming out to the right of your weaving. Change the shed and insert a new weft from the left. Because in my case the side warp threads were lowered, I had to use the pigtail technique to bury the tail of the new weft.

Next weave the right left toward the left weft. I have taken the left weft five warps across and the right weft will be taken six warps across.

Weave the two wefts back to the outer edges.

Weave slit tapestry for a few passes.

The right weft ends underneath a raised warp, so in order to end I just trimmed it

This is where the amazing coolness of weaving in opposite directions comes in. You can now weave the Left weft over the right weft. It will be in the correct shed.


Pat yourself on the back. You’ve just learned two basic but key tapestry techniques. With these two techniques alone you can weave a sophisticated weaving.

PICK AND PICK
Next, we are going to try our hand at pick and pick. This technique involves alternating weaving two weft threads. The result if you are using, let’s say, two solid contrasting threads is vertical stripes. The reason for this is thread 1 is going over the even warps every time and thread 2 is going over the odd warps every time. It takes two passes of one thread to make a line because in one pass you are covering the odd threads and in the other you are covering the even threads. Therefore, when you alternate them you get these lovely vertical stripes. This is a good technique to add interest to your piece but also for some shading.
There are two versions of pick and pick. One is when the side warp thread is raised and one is when it is lowered. In this case we will show you how to do it when the side warp threads are lowered. We will deal with the other version in a bit.
Leave your working thread so it is coming out of the right of the weaving. Change the thread and weave a second thread over it. We will call the first thread 1 and the second thread 2.

You will note that thread 1 is in front of the side warp thread and thread 2 is behind it.

This is a bit tricky at first. In order to weave thread 1 back again so that it adequately covers the side warp thread, wrap around that warp thread twice before weaving it.

The photo below clearly illustrates this. You will note that thread 2 is in the back of the piece.


Weave weft 2. You will notice the vertical stripes that are beginning to form. When weaving back weft 1, you will. employ the same technique of wrapping around the side warp thread twice.


End weft 1 and continue weaving a few rows with weft 2. End weft 2.
In preparation for weaving the second version of pick and pick, add a new weft thread making sure the side warp threads are lowered.

Add a second weft thread going in the same direction.

You will need to employ a pigtail to bury the tail of the second weft.


When weaving weft 1 wrap it around the working end of weft 2 as shown below.

When you pull on weft 1 it will correctly place weft 2.

Yup, it’s a little like magic. The goal is to make sure those stripes exist.

You are doing great. Keep weaving that pick and pick.


WAVY LINES
Next we are going to weave wavy lines. If your colors are solid this technique will appear more obvious. But the deal is this: instead of weaving weft 1 and then weft 2, you are going to weave weft 1 twice and then weft 2 twice. It is called wavy lines because that’s how it appears: a series of wavy lines.Unlike pick and pick nothing gets wrapped at the edges. You just weave.


Keep playing replacing wefts as you need to.


SOUMAK KNOTTING
Next we are going to weave (well, it’s actually a knotting technique) single soumak knots.

Take your needle under warp two and three.

Then take it behind and around warp 3 and 4.

You are making knots around the warp threads.

Once you’ve wrapped around the side warp, stick your needle between the two warp threads to keep that knot secure.


Head back in the other direction with these knots.


MORE WEAVING…
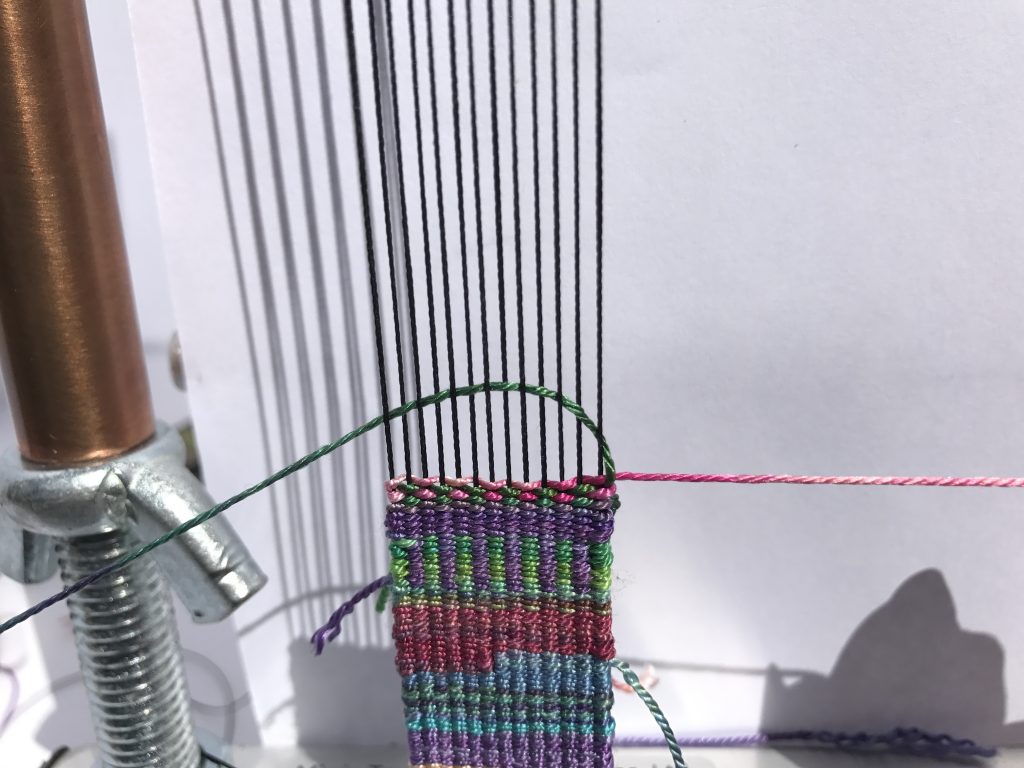
Let’s try some more slit tapestry. Insert two threads going in opposite directions.

Weave them both back to the selvedges.


Ah those slits. Are they not lovely?

Now for a cool little trick. Don’t take the right weft all the way to the slit. End it a couple of warps sooner and take the weft thread to meet it in the new place. Because of this weaving in opposite directions thing, you can sneak adjoining wefts into new territories and still be in the correct shed.


I have ended the left weft and wove the remaining weft in its place.

Measure your piece to see how far you’ve come. I know, it goes way too quickly. Thank goodness this your kit includes enough material to weave two pieces.

This is what mine looks like.

ADVANCING YOUR WEAVING
Now, I would like to advance my weaving. I like to keep the working part of my piece at a level where I don’t have to lift my arms too high so once the tapestry starts growing too tall, I advance the weaving. Cut the thread you wove in to create a base.

Turn the wing nuts clockwise to loosen the tension

Pull up on the warping bar so that the weaving slides to the back of the loom.

Turn the wing-nuts counter-clockwise to increase the tension back to how it was.

CONTINUING TO WEAVE
For the remainder of your piece employ the techniques you’ve learned.

For my six inch wrist, I wove a seven inch piece. There is room for adjustment when you put on the finding which creates more length. But based on my measurements you want to weave a piece that is an inch longer than your wrist. Your piece will shrink slightly when it is removed from the loom.

Finish your piece by weaving a footer of warp material.

Here is my finished piece:

I hope you’ve had fun weaving this. Next week we will finish it.
Have a question? Want to share your progress so far? Email us or ask on our Mirrix Facebook Group.